
티스토리 뷰
728x90
반응형
커맨드 패턴
커맨드(Command) 패턴은 객체지향 디자인 패턴 중 하나로, 요청을 객체의 형태로 캡슐화하여 사용자가 서로 다른 요청을 실행할 수 있도록 합니다. 즉, 요청을 발생시키는 객체와 요청을 처리하는 객체 사이의 결합도를 낮추는 데에 사용됩니다.
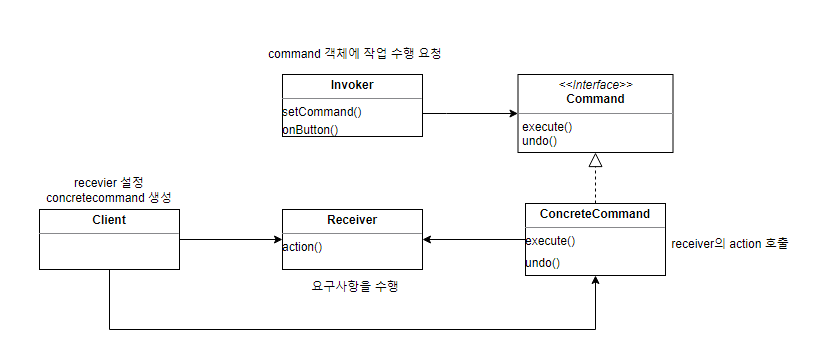
- 요청을 하는 객체(Invoker)와 요청을 수행하는 객체(Receiver)를 분리
- Command 객체가 Receiver 객체를 캡슐화
- Command 객체를 이용해서 요청을 매개변수화 가능
- Command 인터페이스: 수신자 객체와 관련된 작업을 수행하는 execute 메서드를 제공합니다.
- ConcreteCommand 클래스: Command 인터페이스를 구현하는 구체적인 커맨드 클래스입니다. 요청을 수신자 객체에 전달하는 책임을 갖습니다.
- Receiver 클래스: ConcreteCommand 클래스에서 요청을 처리하는 객체입니다.
- Invoker 클래스: ConcreteCommand 객체를 생성하고, execute 메서드를 호출합니다.
커맨드 패턴 장점
- 객체 간의 결합도를 낮춥니다. 호출자와 수신자 간의 의존성이 Command 객체 하나로 캡슐화됩니다.
- 실행 취소, 다시 실행 등의 기능을 쉽게 추가할 수 있습니다.
- 실행할 요청을 Queue에 저장하고, 지연 시간, 스케줄링 등의 기능을 추가할 수 있습니다.
커맨드 패턴 단점
- 커맨드 객체를 생성하고 보관하는 데 추가적인 비용이 들어갑니다.
- 복잡한 로직을 처리하는 경우, 많은 수의 커맨드 객체를 생성할 수 있습니다. 이 경우, 메모리 부하가 증가할 수 있습니다.
- 추가적인 클래스와 인터페이스를 만들어야 합니다. 따라서, 코드의 양이 증가할 수 있습니다.
커맨드 패턴 활용
- 작업 큐에 커맨드를 추가하고 하나씩 제거하면서 커맨드의 execute()를 실행
- 명령을 실행하면서 디스크에 실행 히스토리를 기록하고,
앱이 다운되면 커맨드 객체를 다시 로딩하고 execute() 를 자동으로 순서대로 실행
    public static void main(String[] args) {
        SimpleRemoteControl remote = new SimpleRemoteControl(); //invoker
        Light light = new Light("Basic");      //receiver
        LightOnCommand lightOn = new LightOnCommand(light); //command
        LightOffCommand lightOff = new LightOffCommand(light);

        remote.setCommand(lightOn);
        remote.buttonWasPressed();

        RemoteControl remoteControl = new RemoteControl();

        Light livingRoomLight = new Light("LivingRoom");
        LightOnCommand livingRoomLightOn = new LightOnCommand(livingRoomLight);
        LightOffCommand livingRoomLightOff = new LightOffCommand(livingRoomLight);

        remoteControl.setCommand(0, livingRoomLightOn, livingRoomLightOff);

        remoteControl.onButtonWasPushed(0);
        remoteControl.offButtonWasPushed(0);

        Command[] partyOn = {lightOn, livingRoomLightOn};
        Command[] partyOff = {lightOff, livingRoomLightOff};
        MacroCommand partyOnMacro = new MacroCommand(partyOn);
        MacroCommand partyOffMacro = new MacroCommand(partyOff);

        remoteControl.setCommand(1, partyOnMacro, partyOffMacro);
        remoteControl.onButtonWasPushed(1);
        remoteControl.offButtonWasPushed(1);
    }
public class Light {    //Receiver
    String location = "";

    public Light(String location) {
        this.location = location;
    }

    public void on() {
        System.out.println(location + " light is on");
    }

    public void off() {
        System.out.println(location + " light is off");
    }
}
public interface Command {
void execute();
void undo();
}public class LightOnCommand implements Command { //커맨드 객체
Light light; //Receiver
LightOnCommand(Light light) {
this.light = light;
}
@Override
public void execute() { //리시버의 특정 작업을 처리
light.on();
}
@Override
public void undo() {
light.off();
}
}public class RemoteControl {
Command[] onCommands;
Command[] offCommands;
Command undoCommand; //마지막으로 사용한 커맨드 객체 저장
public RemoteControl() {
onCommands = new Command[7];
offCommands = new Command[7];
Command noCommand = new NoCommand(); //아무것도 하지 않는 커맨드 객체. null 처리를 하지 않기 위해
for (int i=0; i<7; i++) {
onCommands[i] = noCommand; //기본 값으로 설정
offCommands[i] = noCommand;
}
undoCommand = noCommand; //undo 버튼을 누르더라도 아무 것도 안함
}
public void setCommand(int slot, Command onCommand, Command offCommand) {
onCommands[slot] = onCommand;
offCommands[slot] = offCommand;
}
public void onButtonWasPushed(int slot) {
onCommands[slot].execute();
undoCommand = onCommands[slot];
}
public void offButtonWasPushed(int slot) {
offCommands[slot].execute();
undoCommand = onCommands[slot];
}
public void undoButtonWasPushed() {
undoCommand.undo();
}
}
728x90
반응형
'Java > Design Patterns' 카테고리의 다른 글
| 퍼사드 패턴 (Facade Pattern) (0) | 2023.05.02 |
|---|---|
| 어댑터 패턴 (Adapter Pattern) (0) | 2023.04.27 |
| 싱글턴 패턴 (Singleton Pattern) (0) | 2023.04.17 |
| 추상 팩토리 패턴 (Abstract Factory Pattern) (0) | 2023.03.17 |
| 팩토리 패턴 (Factory Pattern) (0) | 2023.03.05 |
반응형
300x250